PyTorch Tensor Tutorial (4): Wie kann ich eine .JPG Datei in einen Tensor umwandeln?
In diesem Blogbeitrag wollen wir uns mit einem grundlegenden, aber wichtigen Schritt im Training neuronaler Netze in PyTorch befassen: der Umwandlung von Bildern in Tensoren. Tensoren sind mehrdimensionale Arrays, die in PyTorch benötigt werden, um Bilddaten in neuronalen Netzen zu verarbeiten. Der Weg von einem Bild zu einem Tensor besteht aus mehreren einfachen, aber notwendigen Schritten.
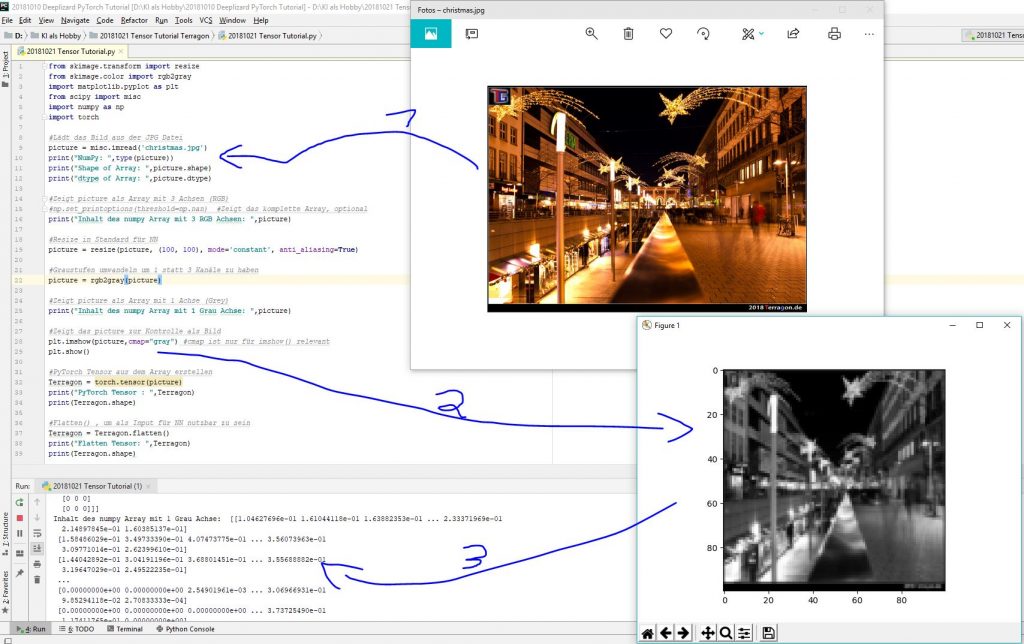
Zuerst müssen wir das Bild in unser System laden. In unserem Beispiel verwenden wir ein Bild mit dem Dateinamen „Christmas.jpg“. Nachdem das Bild geladen ist, wird es als NumPy-Array dargestellt, das die Bilddaten speichert. Jedes Bild hat eine bestimmte Höhe und Breite, und bei farbigen Bildern besteht es aus drei Kanälen (Rot, Grün und Blau – RGB), die jeweils einen bestimmten Wert für die Farbe jedes Pixels angeben.
Das Bild selbst kann als rohes Datenarray angezeigt werden, wobei jeder Farbwert des Bildes numerisch dargestellt wird. Für RGB-Bilder hat jedes Pixel drei Farbwerte, die zwischen 0 und 255 liegen.
Da neuronale Netze eine feste Eingabegröße erwarten, müssen wir alle Bilder auf eine einheitliche Größe bringen. Dies ist notwendig, um sicherzustellen, dass das neuronale Netz mit einer festen Anzahl von Eingabewerten arbeitet. In unserem Beispiel haben wir die Größe des Bildes auf 100×100 Pixel reduziert, sodass jedes Bild eine standardisierte Dimension hat. Durch diese Verkleinerung wird die Verarbeitung effizienter und einfacher.
Ein weiterer häufiger Schritt in der Bildverarbeitung ist die Umwandlung eines Bildes in Graustufen. Dies reduziert die Komplexität des Bildes, indem die Farbinformationen entfernt werden. Anstelle von drei Kanälen für Rot, Grün und Blau bleibt nach der Umwandlung nur noch ein Kanal übrig, der die Helligkeit des Pixels darstellt. Das Bild besteht dann nur noch aus einer Matrix mit Werten, die die Grautöne repräsentieren.
Nach diesen Vorbereitungen kommt der entscheidende Schritt: die Umwandlung des Bildes in einen Tensor. Ein Tensor ist in PyTorch das Format, das für die Verarbeitung in neuronalen Netzen verwendet wird. Dabei wird die zweidimensionale Bildmatrix in eine Struktur umgewandelt, die von PyTorch verarbeitet werden kann.
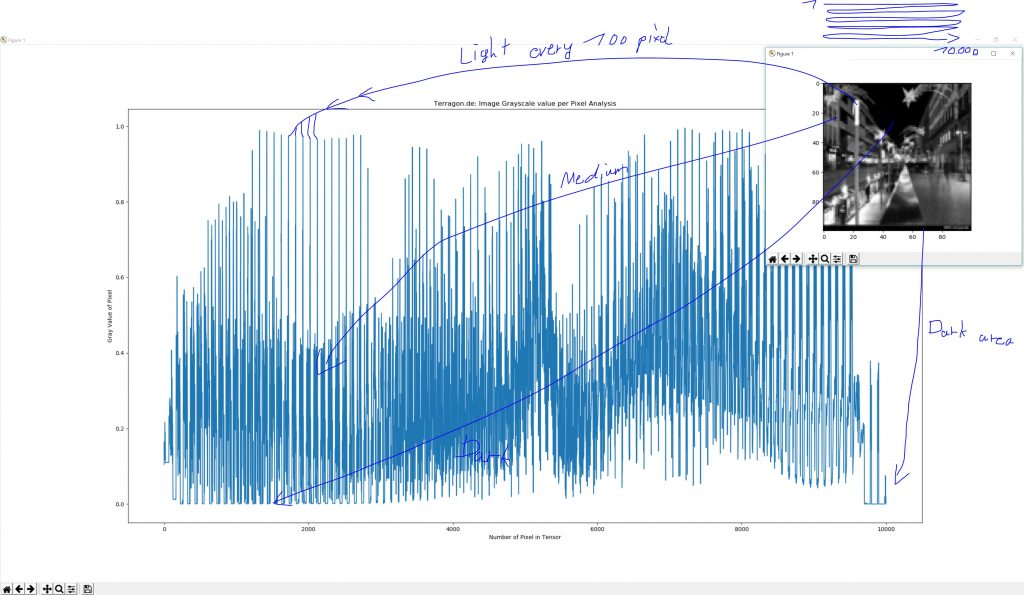
Um das Bild für die Eingabe in ein neuronales Netz vorzubereiten, müssen wir den Tensor dann noch in eine eindimensionale Form bringen. Das bedeutet, dass wir alle Pixelwerte des Bildes in einer langen, eindimensionalen Liste anordnen. In unserem Fall, bei einer Bildgröße von 100×100 Pixeln, besteht diese Liste aus 10.000 Werten. Jedes Pixel des Bildes hat nun einen Platz in dieser Liste, die dann als Eingabe für das neuronale Netz verwendet werden kann.
Dieser Prozess – vom Laden des Bildes über die Anpassung der Größe und die Umwandlung in Graustufen bis hin zur Konvertierung in einen Tensor – ist entscheidend, um Bilddaten für neuronale Netze nutzbar zu machen. Er stellt sicher, dass die Daten im richtigen Format vorliegen, damit das neuronale Netz sie verarbeiten und lernen kann.
Obwohl dieser Vorgang für erfahrene PyTorch-Entwickler Routine ist, ist es ein essenzieller Schritt für jedes maschinelle Lernprojekt, das mit Bilddaten arbeitet. Es ist wichtig, die Grundlagen der Datenvorverarbeitung zu verstehen, um erfolgreiche Modelle zu erstellen und effizient trainieren zu können.
 9 comments


