PyTorch Tensor Tutorial (4): Wie kann ich eine .JPG Datei in einen Tensor umwandeln?
C. v. T. 
 • Bookmarks: 81
 • Comments: 3
Eine .JPG Bild-Datei in einen Pytorch Tensor umwandeln 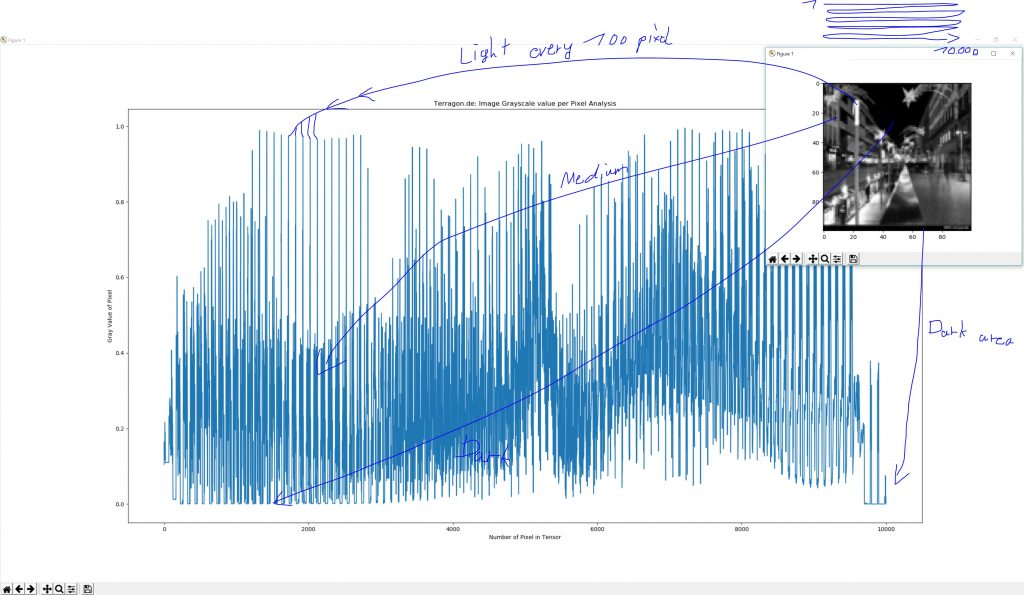
Eine .JPG Bild-Datei in einen Pytorch Tensor umwandeln
Transcript for this Tutorial
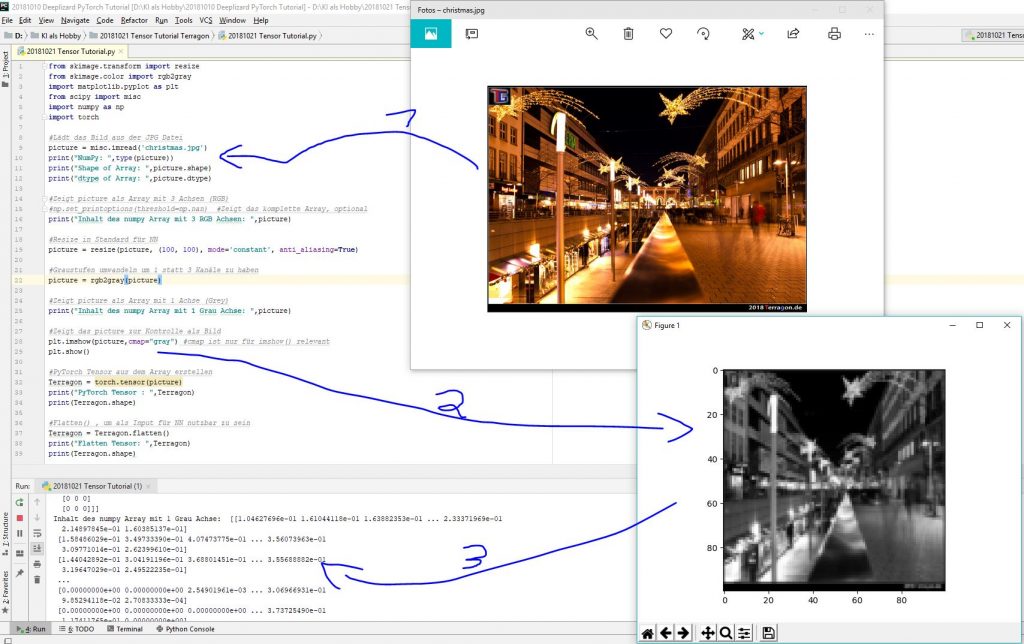
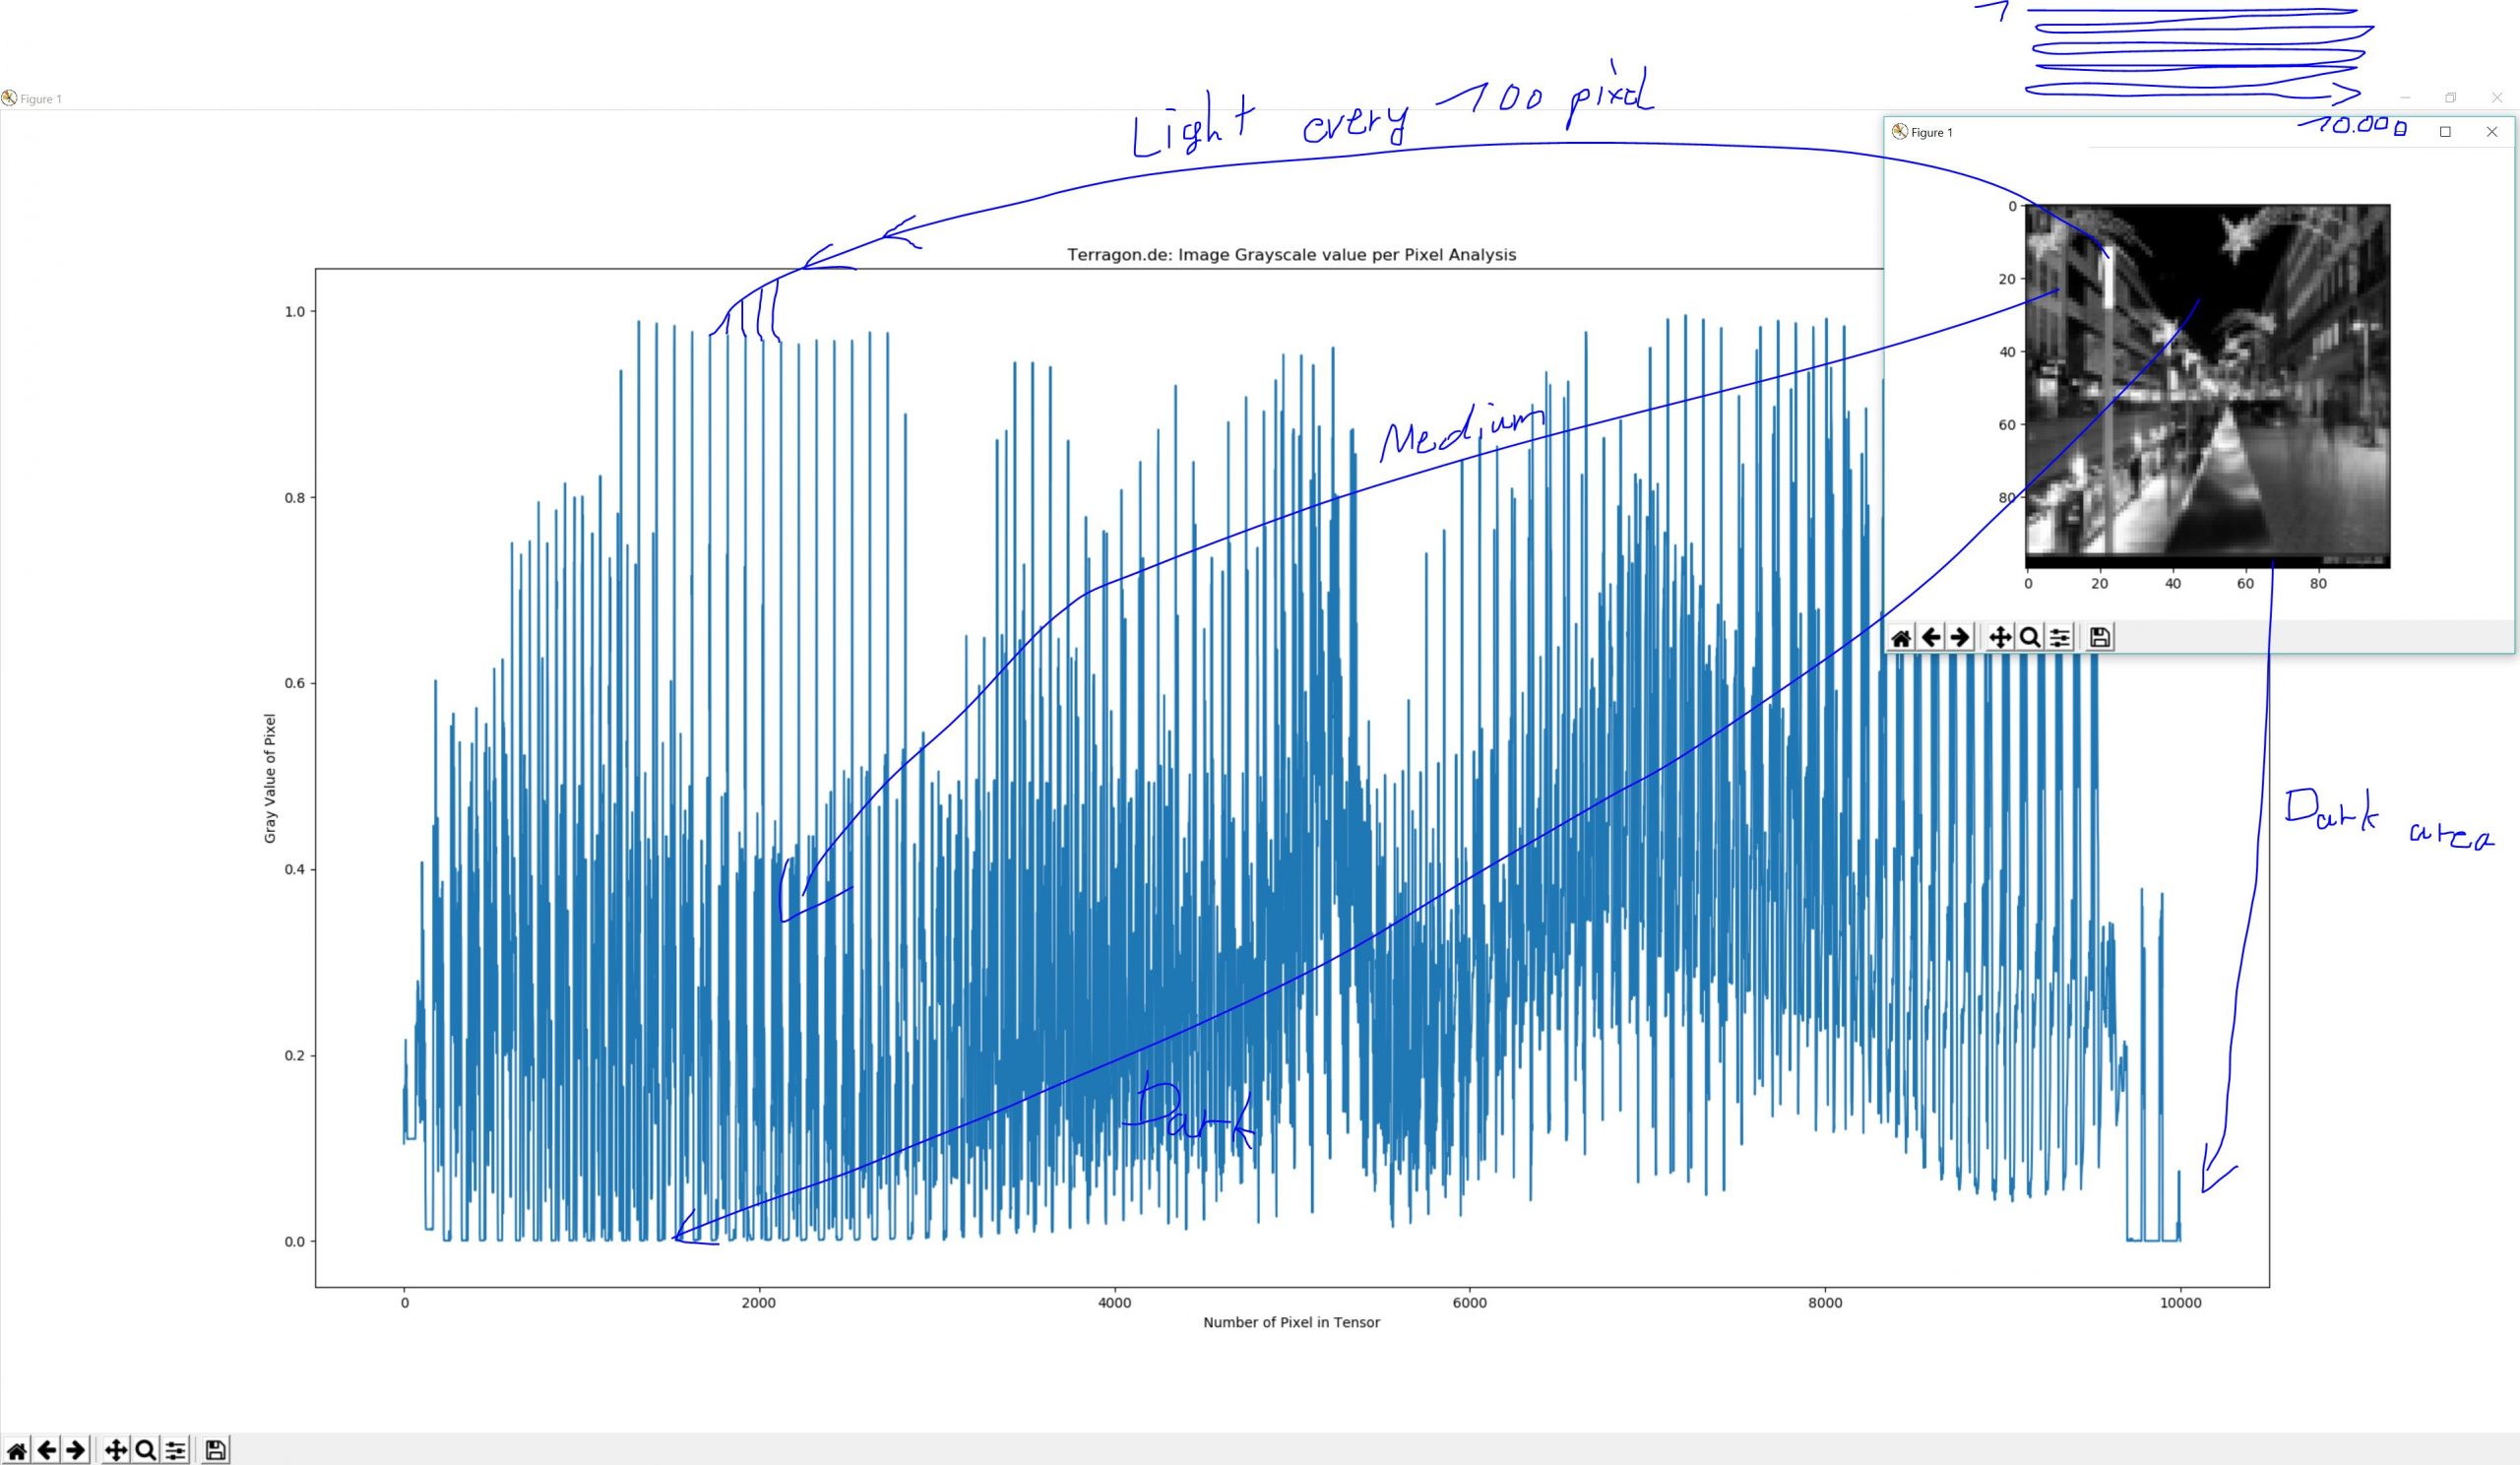
hello everybody and welcome back to another pie torch tutorial in which we want to see how um to convert uh images oops images into tensors so that we can feed them into neural networks for example and for that we want to import some stuff we have here the SK image um yeah library from which we want to import the resize function and the RGB to Grace to gray that converts um the picture into grayscale um just to make it more easy to analyze but we will see later why the matplotlib is just um for printing also results um yes and the misc is the Sci-Fi misc is just for General Imports of the image and we need numpy and torch so the first step is very simple we just load our image um that has here the file name Christmas dot jpg which is this one like we see here and for that we use the image read function from misc so that’s why we need that and we save that file into the pictures variable um and just for information about this we print um different things so we started to see what’s coming and we see here um yes it is an Umpire array already um the shape of the array is five six six to eight hundred and two three and that means it is 566 pixels high and 800 pixels wide and we have at the moment complete RGB so it’s a colorful a colored picture with three channels for RGB and is uh the type is uint that means all values are just ins so and now we have um the picture in the system we make the first step process that and um for that we can and with that we just print the content of the of the picture which we do now and we see okay he is showing us the not the tensor but the array and um we see here it is a compressed version so he is leaving out many things because that’s a regular type he shows the content when it’s too much and we can optionally use this command the numpy set print options um that’s yes threshold none that means he will show everything that will take a while but then he’s showing um the complete content of the picture array and we see now there are all the single values for every pixel here and we see it’s always between s we see it’s ins so we can check that like here we saw it’s the the int type and we have values between 0 and I think 255. yes so that is raw data from this picture here um because neural Nets always need the same size of the pictures but now for the future for the next steps here we will uncomment this again so that he doesn’t show the whole thing all the time and um we go with the short version and the next thing is to resize all the pictures because when we have more of them they need all the same size because neuron let’s have the same amount of inputs so that every picture has to have the same yes inputs um so there’s not the same inputs but the same amount of inputs so we have to resize the pictures all to the same number of pixels um these two I don’t really know why we have to do that but it’s uh the internals of the resize function um yes so then it’s working when it’s written like that so we start and we see what he is doing um he has resized it but we want to show it also we have to print one second we take this one here it’s uh yes the C wrap is already gray but that’s coming The Next Step but now just to show the image we use that snippet here also and when we run the code he is opening a new window where he resized this picture here to 100 to 100 pixels and that will be the standard for all the pictures we need for our neural network and um now it has three data values for every pixel and we want to change that to have only one color channel so it’s a grayscale image then we add the step in between to change the picture here with the RGB to Gray with the picture again so he’s overwriting that um with this function here and then we convert the color channels to only one grayscale Channel and we run again is opening again showing again and now we need the cmap gray command here because normally the image show function makes the picture um in strange colors like blue and yellow and stuff like that so just to make clear that we have only grayscale we have to add this but now the picture information is only grayscale and [Music] um then we want to print not only the picture here but we also want to print um the content of the new array with the grayscale information and we see here this is our old one and here is the content of the new um of a new grayscaled arrays um then we show the picture and the next step is to change to convert the array into a tensor so that Pi torch can work with that and we want to make that uh with this simple block here um we add a tensor that is called Teragon for example and this is a torch tensor and we convert the picture here this one with the grayscale information into this tensor and then we print the tensor to see what it looks like and we see here this is Supply torch tensor but this is here the print command and we see here okay it’s really a tensor and all the values um are shown here so that we have yes only a two-dimensional uh tensor that has only the size of 100 pixels wide and 100 pixels hate and so this is uh yeah almost a result and in this state the tensor is not using cannot be imported into a neural network so that we have the last command for this tutorial which is the flattened function so that we just take this Matrix tensor and convert this into a string with only [Music] um yes a very long string that is had all has only one dimension which has now 100 multiplied by 100 pixel informations this is ten thousand so our neural network will have 10 000 inputs and input neurons with these values here so this will be the first value second value third value end here the ten thousands value um yeah and this is yeah almost uh the whole yes this is the whole information from this resized and grayscaled picture to use in neural networks and when we have more of them we need for example 10 000 pictures then we will have 10 000 times these 10 000 uh values here so just to get a feeling how much information is needed okay so thank you very much and in the next tutorials you will see what we can more with this

 3 comments
 0 shares
