In this series i want to share my adventure with the Open Source and AI-powered Unmanned Ground Vehicle (UGV) without any hardware experience 🙂
Disassembling Our Robot: A Closer Look at the Hardware Components
Welcome back to the second part of our deep dive into the inner workings of our robotic companion. In this installment, we’ll explore the hardware components that make this machine tick. What better way to understand a robot than to unassemble it and examine its core? Let’s get started!
Starting with the Battery Packs
Before diving into the electronics, the first task is assembling the battery packs. These are essential for powering up the robot and testing any hardware components.
- Battery Selection: We opted for Samsung batteries, purchased separately to ensure quality and compatibility.
- Assembly Note: Make sure to follow the manufacturer’s guidelines when assembling the battery packs to avoid any mishaps.
Examining the Motors
Our robot boasts a robust motor setup:
- Wheel Configuration: Although the robot has six wheels, only four are powered by motors, making it a four-wheel drive system.
- Motor Placement: The motors are attached to the four main wheels, providing the necessary torque and control.
Accessing the Internal Components
To get to the heart of the robot, we need to remove the top cover:
- Flipping the Robot: Start by turning the robot over to access the underside.
- Removing the Top Cover: Carefully unscrew the top part to reveal the internal hardware.
The Camera Module and Sensors
Under the hood, we find several key components:
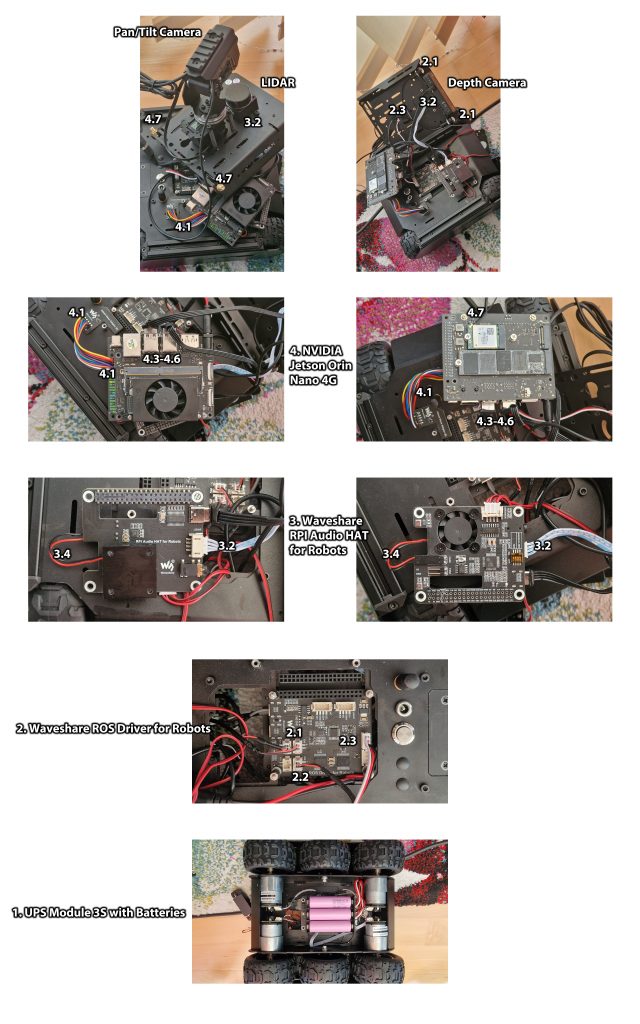
- Pan-Tilt Camera Module: This module allows the camera to move horizontally (pan) and vertically (tilt), providing a dynamic field of view.
- LiDAR Sensor: Located next to the camera, the LiDAR sensor helps the robot perceive depth and navigate its environment.
The ROS 2 Robot Driver Board
One of the main boards in the robot is the ROS 2 driver board, responsible for various control functions.
Key Connections:
- Front LEDs: Two cables connect to the front LEDs, labeled as
IO4, allowing independent control of each light. - Pan-Tilt Camera LED: The
I5connection powers the LED on the pan-tilt camera module. - Pan-Tilt Functionality: A dedicated cable connects to the camera’s pan-tilt mechanism. Ensure this is securely connected; otherwise, the camera won’t move.
The Audio Module and Speakers
Sound is an essential aspect of interactive robots.
- Speakers: Two speakers are connected via the
Speakerconnection on the audio module. - USB Connection: The audio module connects to the main processing unit through a USB cable.
Cooling Fan and LiDAR Connections
Proper cooling and sensor functionality are crucial.
- Cooling Fan: A red cable connects the cooling fan, ensuring the system doesn’t overheat.
- LiDAR Connection: A blue and white cable connects the LiDAR sensor, vital for depth perception.
The Jetson Orin Nano: The Robot’s Brain
At the core of the robot’s processing capabilities is the Jetson Orin Nano.
Features and Connections:
- USB Ports: Four USB ports are available, two of which are used:
- Depth Camera: Connected via a standard USB cable.
- Audio Module: Also connected via USB.
- Ethernet and Display Ports: Options for network connectivity and connecting a monitor.
- Power Supply: A dedicated power cable keeps the Jetson Nano running.
Communication Between the Jetson Nano and Baseboard
A harmonious interaction between the processing unit and the control board is essential.
- Interface Adapter: A multi-colored cable connects the Jetson Nano to an interface adapter.
- Baseboard Connection: This adapter links to the baseboard, allowing communication for tasks like wheel motions and sensor data processing.
Reassembling the Robot: Tips and Precautions
When putting everything back together, keep the following in mind:
- Handle Cables with Care: The cables are intentionally short to prevent clutter, but this means they can easily become disconnected if pulled.
- Common Issue: A slightly disconnected cable can cause components like the camera to stop working. Always double-check connections.
- Secure the Wi-Fi Antennas: The antennas are delicate.
- Fragility Warning: They can break if not handled gently. Reconnecting them requires precision.
Conclusion
Exploring the inner workings of our robot provides valuable insights into its capabilities and functionalities. By understanding each component and its role, we can better appreciate the complexity and engineering behind these machines.
Stay tuned for our next installment, where we’ll delve into the software aspects. We’ll also include detailed images in the description to further illustrate the hardware layout.
Note: Always ensure you’re following safety guidelines when disassembling electronic devices. If you’re unsure about any step, consult the manufacturer’s instructions or seek professional assistance.

 3 comments


